Delicious Strawberry & Cream Cheese Cobbler

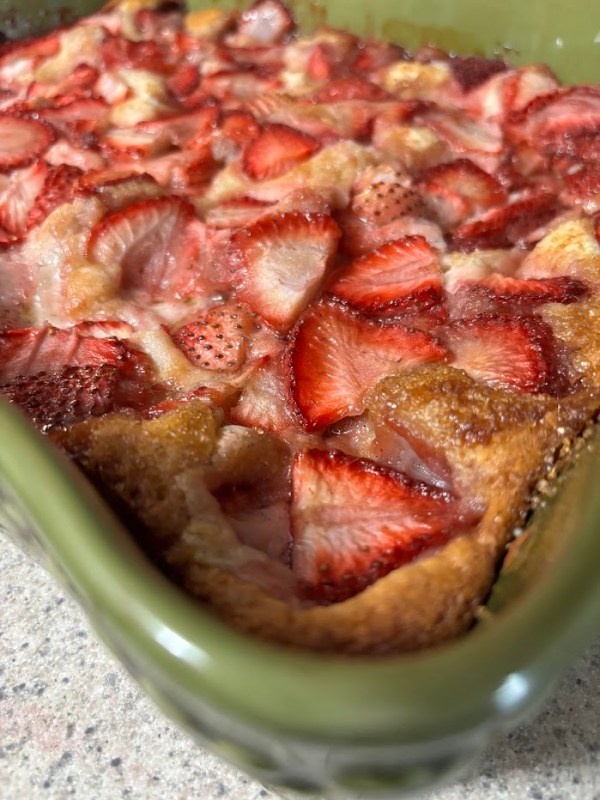
Recipe Highlight: This is one of my kids’ favorites! While some request chocolate for Valentine’s Day, my kiddos request this comforting cobbler.


Link: https://preppykitchen.com/strawberry-cobbler/


Please click on the link above for the original recipe.

If you use the recipe below, let me know how you feel about these changes!

INGREDIENTS:

For strawberries:

  • 2 pounds fresh strawberries hulled and halved
  • 1/2 cup granulated sugar

For cobbler:

  • 9 tablespoons unsalted butter 
  • 2/3 cup sugar
  • 2¼ cup all-purpose flour 
  • 2½ teaspoons baking powder
  • 1¼ cup milk 
  • 2 teaspoons vanilla extract
  • ½ teaspoon kosher salt

For cream cheese filling:

  • 1 block of cream cheese
  • 1/2 cup of powdered sugar
  • 2 teaspoons of vanilla extract

INSTRUCTIONS:

  • Preheat the oven to 350°F.
  • In a large bowl, stir together the strawberries and 1/2 cup of sugar. Set aside to macerate.
  • Add the butter to a 13×9-inch baking dish and place in the preheated oven until the butter is melted, about 10 minutes.
  • Meanwhile, in a medium mixing bowl, whisk together the flour, baking powder, salt, and 2/3 cup of sugar. Add the milk and vanilla extract. Stir just until combined. Set aside.
  • Using a mixer, cream together the block of cream cheese, 1/2 cup of powdered sugar, and 2 teaspoons of vanilla. Set aside.
  • Carefully remove the baking dish from the oven and pour the batter over the melted butter. Next add the cream cheese mixture by heaping tablespoons to the top of your batter. Finally, spoon the juicy strawberries over the batter dotted with cream cheese.
  • Bake for 55 to 60 minutes or until the batter is golden brown and the strawberry juices are bubbling. In the last 15 minutes or so, sprinkle with turbinado sugar for texture, if desired.
  • Let cool for 15 minutes.

NOTES:

The cream cheese filling is an over-the-top addition that my kids loved, but it is entirely optional! It is delicious, regardless! I will continue to update recipe as I tweak here and there.

Kiddos: I love you so much, and I hope you think of me when you make this in your own kitchen.

Quick & Easy No-Knead Bread Recipe

Quick & easy, this no-knead bread recipe can get a hot & tasty homemade loaf on the table in no time!

Recipe Highlight: The recipe link below has recipe for both a quick rise (2 hours) and overnight rise (12 to 18 hours). I have included my tweaked version of the quick rise recipe, but please head over to Gimme Some Oven’s website for detailed instructions for both original versions.


LINK: https://www.gimmesomeoven.com/no-knead-bread/


INGREDIENTS:

  • 3-1/4 cups (430 grams) of All Purpose flour
  • 2 teaspoons kosher salt
  • 1 teaspoon honey or granulated sugar
  • 1 packet (7 grams) of active dry yeast
  • 1-1/2 cups warm water (about 110 degrees) — or more, as needed. Depends on how thirsty your flour brand is. Trader Joe’s AP tends to need more water. Check the link above for a picture of how it should look at the dough stage.

INSTRUCTIONS:

  1. Mix the dough. Stir the dry ingredients together in a large bowl until combined. Add in the warm water and stir with a spatula until the dough is mixed. Please note: The dough will be loose and sticky with some scraggly bits! As mentioned in the ingredients list, it may need more water depending on the brand/type of flour used.
  2. Let the dough rise. Let the dough rest at room temperature for 2 hours or until the dough has doubled. See notes section for some proofing tips!
  3. Shape the dough: Transfer to a well-floured surface, folding the dough on top of itself by pulling the outer edges up and into the center a few times until the dough holds its shape & forms a round dough ball. Lightly flower the top of the dough ball and then carefully flip it upside-down onto a peice of parchment paper. The smooth side should be on top. Use your hands to shape the ball into an even circle before lightly flouring the top of the dough ball before covering loosely with plastic wrap or a kitchen towel.
  4. Preheat the oven & Dutch Oven. Toss your Dutch oven inside cold oven (to avoid cracking enamel) and set to 450 degrees to pre-heat for about 30 minutes while allowing the bread ball to rest.
  5. Bake the bread. Transfer the dough ball via the parchment paper into the pre-heated Dutch oven. Be careful as the Dutch oven WILL BE HOT. Cover the Dutch oven with the lid and allow to bake for 30 minutes. At the 30-minute mark, carefully remove the lid and bake for an additional 10-20 minutes (depending on how crispy or golden brown you wish your loaf to be).
  6. Cool down. & serve Remove from the oven, and then carefully lift from the Dutch Oven using the edges of the parchment paper. Transfer to a wire rack, if available, and allow to cool at least 30 minutes before slicing.

NOTES:

You will have the best results if you allow your dough to rise in a warm environment. If you don’t have a proofing box, you can turn your oven on for a few minutes at a low heat to get it warm before turning off the oven and putting in your dough to rise. You can also just turn your oven light on. I have also seen it suggested that you use a space heater in a small room such as a laundry room on really cold days.

An additional tip I have come across regarding a blistering crust is to use a spray bottle with water and spritz on top of floured loaf right before putting into the oven.

The dough can also be used to make a focaccia-like dough. Just drizzle a little olive oil on top and start stippling with your fingertips, finishing with a sprinkling of flaked salt and additional toppings.

Time to get baking!

Hearty Chorizo & White Bean Stew Recipe

Serve with a crusty loaf of bread for a delicious, hearty meal.

INGREDIENTS

  • Olive oil
  • 1 yellow onion (or 4 shallots)
  • 1 carrot, cut into thin medallions
  • 1 stalk of celery, cut into thin slices
  • 1 serrano pepper (left whole with just the stem cut off, exposing the inner flesh/seeds)
  • 4 cloves of garlic, minced (to taste)
  • 2 tablespoons tomato paste
  • 1 tbsp of fresh rosemary/thyme (either/or/both)
  • 6 ounces of chorizo
  • 2 cans of white beans (Great Northern or cannellini)
  • 1 quart of chicken broth (or water with 2+ tablespoons of Boullion)
  • 1 bunch of greens (I used rainbow chard)
  • A few generous shakes of garlic powder and Badia complete
  • 1 teaspoon kosher salt (to taste)
  • 1/2 teaspoon of cracked black pepper (to taste)
  • 1 tablespoon of red pepper flakes (to taste)
  • 1/3 cup of grated parmesan cheese
  • 1-1/2 teaspoons of red wine vinegar
  • 1/2 cup of ditalini pasta, if desired

INSTRUCTIONS

  1. Coat Dutch oven with olive oil & add in veggies to caramelize and soften, saving the minced garlic until the end to ensure it does not burn. Just a reminder to leave the serrano pepper whole!
  2. Once veggies are softened, add in your chorizo and cook through before making a well in the center of your pan to add in your tomato paste. Caramelize your tomato paste for at least 2 minutes to ensure it has optimized flavor.
  3. Add in herbs and spices, before adding in broth, beans, and greens. Cook for about 20 minutes (or until greens are wilted).
  4. Using an immersion blender, make a few quick passes to blend just enough to thicken soup. Do not blend smooth! The satisfying textures of the vegetables, chorizo, and beans are the best part of this stew.
  5. If using, add in the pasta and cook for about 15 minutes on medium heat (or until pasta is desired tenderness).
  6. When pasta is desired tenderness, add in parmesan cheese and red wine vinegar.

NOTES

How much you use the immersion blender will have a large impact on how thick this stew is. For colder months, a thicker, hearty stew will hit the spot. For warmer months, leaving it thinner will give it more of a soup-like feel for a light, healthy meal. Top with additional grated parmesan, a few red pepper flakes, and serve with a crusty sourdough loaf for a meal to remember.

This one if for you, Audrey. I love you so much!

Ultimate Spicy Chili Recipe for Snow Days

This is a must-have for any snow day!

INGREDIENTS

  • Olive oil
  • 1 yellow onion (or 4 shallots)
  • 1/2 red bell pepper
  • 1/2 green bell pepper
  • 1 serrano pepper
  • 2 jalapeno pepper
  • 4 minced garlic cloves (or to taste)
  • 2 pounds lean ground beef
  • 1/4 cup Worcestershire sauce
  • garlic powder (to taste)
  • Badia complete (to taste)
  • 16 oz of beef broth (or water + 2 bouillon cubes)
  • 1 can (28 oz) of crushed tomatoes
  • 1 can (14.5 oz) of fire-roasted diced tomatoes
  • 1 can tomato paste (can leave out if you want more of a thin Wendy’s chili texture)
  • 2 tablespoons chili powder
  • 2 tablespoons cumin
  • 1 tablespoon brown sugar
  • 1 tablespoon hot sauce (I used Scotch Bonnet)
  • 1 tablespoon dried basil
  • 2 tablespoons smoked paprika
  • 1 tablespoon dried oregano
  • 1 teaspoon of dried peri peri pepper flakes (crushed red pepper flakes will work!)
  • salt & pepper (to taste)
  • 3 cans of beans (I use 1 each of the following: pinto, black beans, and dark red kidney beans)
  • assorted toppings (cheese, sour cream, cilantro, diced onions, corn chips, etc.)

All seasonings can be adjusted to your own liking!

INSTRUCTIONS

  1. Chop your veggies into a small dice.
  2. Coat the bottom of a Dutch oven with olive oil and sauté your veggies until soft, around 5 minutes. If needed, add a little water to keep from sticking to bottom of the pan.
  3. Add in your ground beef to your caramelized veggies and cook until browned.
  4. Once your meat is browned, add in the Worcestershire sauce and flavor with a few generous shakes of dried garlic powder and Badia complete. Add a pinch of salt and pepper at this time as well.
  5. If using tomato paste (depending on if you want a thin or thick chili), make a well in the center of your meat and veggie mixture before adding your tomato paste. Allow your tomato paste to cook for about 2 minutes, ensuring that it caramelizes and optimizes its flavor.
  6. Once tomato paste is caramelized, add in your spices and cook for another minute, allowing them to bloom.
  7. Once spices are bloomed, add in the remaining ingredients: broth, cans of tomatoes, and beans.
  8. Once heated through and thickened (at least 20 minutes), taste and adjust spices accordingly.
  9. Top with cheese, sour cream, chopped cilantro, diced onions, corn chips, etc.

NOTES

While it looks like a lot of ingredients, most of them are spices and pantry staples. Feel free to use whatever you have on hand when it comes to peppers and beans, but the listed peppers are what I used to get praise-worthy results! I love a mix of beans (pinto, black beans, and dark red kidney beans) to give the chili different textures, so feel free to experiment there if you wish!

Nothing says love on a cold day like a bowl of spicy chili and a slice of warm, slathered corn bread.

I love you, kiddos!

Mom’s Homemade Corn Flake Candy: A Pantry-Friendly Treat

Mom always had ingredients for this snack on hand, especially during leaner times! It’s a cheap fix for any sweet tooth not watching their waistlines! I post this here, not simply for posterity’s sake, but because not doing so would be criminal! It’s a family favorite.

INGREDIENTS

  • 1 cup sugar
  • 1 cup light Karo syrup
  • 1 cup peanut butter (chunky or creamy … your choice!)
  • 5 cups of corn flakes

INSTRUCTIONS

Bring sugar and Karo syrup to a boil in a large sauce pot. Once boiling, add peanut butter. Bring back to a boil and then cook for 1 minute. Remove from heat and add corn flakes, stirring until coated. Quickly spread mixture onto a counter lined with parchment paper. Cool. Break into pieces before storing.

NOTES

The time on the stove before adding the peanut butter is going to be what determines the texture of the candy. A crispier texture is achieved by adding extra time to the boil before adding in peanut butter. My family always prefers it on the chewier side, so the peanut butter is added ASAP upon boiling and timed to one minute on heat exactly once the peanut butter is added.

Enjoy, kiddos!

Mom’s Crispy Oatmeal Cookies: A Timeless Treat

Memories …

Lunchbox treats. Afternoon snacks. Offerings to Santa.

These cookies are a warm embrace.

My mother would make these for many occasions, and every time I nibble one of these delicious, crispy oatmeal cookies, I am immediately transported to my childhood. When making this recipe, I can see my mom’s delicate handwriting in her little yellow recipe notebook, the well-worn pages marked by messy fingertips.

This recipe is a treasure.

These cookies are my youngest son’s favorite, and I hope that all of my children will have the same sensory memories that I share of my dearly departed mother whenever I smell these baking in the oven.

Noah, Zach, and Audrey? I love you so much.

350 degree oven / Ungreased Cookie Sheet

INGREDIENTS

  • 1 cup shortening
  • 1 cup sugar
  • 1 cup brown sugar
  • 2 eggs
  • 1 teaspoon vanilla
  • 1-1/2 cups self-rising flour
  • 3 cups quick cooking oats
  • 1/2 cup finely chopped pecans, if desired (and we never did)

INSTRUCTIONS

Cream shortening, sugars, egg and vanilla. Mix the dry ingredients together in a bowl and then slowly introduce to the creamed mixture until well combined. Add in the oatmeal (and nuts, if desired).

Divide the dough in half, placing half of the dough onto a sheet of parchment paper or foil, rolling each dough into a log and wrapping tightly. Cookies can be baked immediately or frozen.

When ready to bake, slice cookie dough into thin slices, placing each slice on a parchment lined baking sheet. Cook at 350 for 8 – 10 minutes. Cookies will be done when the edges become slightly golden brown. Remove from cookie sheet immediately and let cool on a wire rack.

NOTES

These are old-fashioned cookies that will bake flat and crispy (akin to the Tate’s brand) instead of thick and cakey (Crumbl, for example).

We prefer our cookies slightly underbaked, golden crispy edges with a soft, chewy center. This is around the 8-minute mark with most ovens. Once removed from the oven, I finish the warm cookies with a sprinkle of Maldon flake salt for the satisfying, salty crunch!

… and don’t forget a tall glass of milk.

Have a favorite oatmeal cookie recipe? Please share!

Old-Fashioned Chocolate Chipper Cookie Recipe

Memories …

Lunchbox treats. Afternoon snacks. Offerings to Santa.

These cookies are a warm embrace.

My mother would make these for many occasions and every time I nibble one of these delicious, crispy chocolate chip cookies I am immediately transported to my childhood. When researching this recipe, it looks like it was originally published in the Joy of Cooking Cookbook, of which my mom was certainly a fan.

These have since found a place in my own home, and I hope that my children will have the same sensory memories that I share of my dearly departed mother whenever I smell these baking in the oven.

Noah, Zach, and Audrey? I love you so much.

375 degree oven / Greased Cookie Sheet

INGREDIENTS

  • 1/2 cup shortening
  • 1/2 cup sugar
  • 1/4 cup brown sugar
  • 1 egg
  • 1 teaspoon vanilla
  • 1 cup flour, sifted
  • 6 ounces package of semi-sweet chocolate chips
  • 1/2 cup chopped nuts, if desired

INSTRUCTIONS

Cream shortening, sugars, egg and vanilla. Slowly add flour and then fold in chocolate chips and nuts. Drop dough by the heaping tablespoon on to a parchment lined baking sheet. Cook at 375 for 10 – 12 minutes. Cookies will be done when the edges become slightly golden brown. Remove from cookie sheet immediately and let cool on a wire rack.

NOTES

These are old-fashioned cookies that will bake flat and crispy (akin to the Tate’s brand) instead of thick and cakey (Crumbl, for example).

We prefer our cookies slightly underbaked, golden crispy edges with a soft, chewy center. This is around the 8-10 minute mark with most ovens. Once removed from the oven, I finish the warm cookies with a sprinkle of Maldon flake salt for the satisfying, salty crunch!

Feel free to experiment … and don’t forget a tall glass of milk.

Have a favorite chocolate chip cookie recipe? Please share!

Scrumptuous Instant Pot Crispy Pork Carnitas (Recipe)

Recipe Highlight: I recently stumbled upon this amazing instant pot recipe from Gimme Some Oven. This recipe is for pork carnitas that are cooked in the instant pot in a flavorful sauce and then finished off under a broiler so that the sauce evaporates and concentrates into each delicious bite of caramelized pork.


Link: https://www.gimmesomeoven.com/instant-pot-crispy-carnitas/


Please click on the link above for the original recipe.

The original recipe consists of detailed instructions for both the instant pot carnitas and a mojo sauce. The recipe below includes the changes I made due to personal taste or availability of ingredients based on what I had in my pantry at the time. 

If you use the recipe below, let me know how you feel about these changes!

PORK:

  • 4-5 pounds of lean, boneless pork, trimmed & cut into chunks
  • salt & pepper (to generously season pork)
  • 1 Tbsp oil of your choice
  • 1 batch of sauce (see below)

SAUCE:

  • 2 cups of water or chicken broth
  • 1 Tbsp chicken bouillon (if using water instead of broth)
  • 1/2 cup lime juice
  • 1/2 a large red bell pepper 
  • 1 whole jalapeno, top removed (can remove seeds if sensitive to heat)
  • 1/8 tsp cayenne pepper (can remove seeds if sensitive to heat)
  • A fist full of cilantro (measure by your heart)
  • 1 Tbsp ground cumin (measure by your heart)
  • 1 Tbsp dried oregano (measure by your heart)
  • 1 tsp kosher salt
  • 1/2 tsp black pepper
  • 1 Tbsp brown sugar

INSTRUCTIONS:

  1. Make your sauce by tossing all the ingredients in a blender and combining. Set aside.
  2. Sear your seasoned pork in the oil of your choice by using the “sauté” feature on your Instant Pot.
  3. Once all sides of your pork is browned, add your sauce to the seared pork.
  4. Cook on high pressure for 30 minutes, followed by a natural release.
  5. Once the pork is cooked, shred the pork using two forks.
  6. Line a baking sheet with foil and turn on the oven’s broiler.
  7. Evenly spread the shredded pork with the sauce onto the lined baking sheet, broiling for about 5 minutes before removing from oven and stirring. Repeat the process until you have reached desired crispiness and most of the sauce has absorbed into the meat. I believe it took me about 3 cycles. This will ensure a deliciously concentrated flavor and caramelized, crispy edges that are simply to die for!
  8. Serve warm as tacos, burritos, quesadillas, rice bowl … etc.

NOTES:

This recipe is definitely worth the effort of lugging your instant pot out of the forgotten corner in the pantry.

I served these mouth-watering morsels of crispy pork over Mexican rice with black beans and topped with sour cream, a squeeze of lime juice, and additional cilantro. My family made quesadillas with the carnitas, and I can’t imagine how amazing they would taste served traditionally in corn tortillas.

Choose your own vehicle for these unforgettable carnitas … I won’t judge!

Stay tuned for a photo of my spin on this delicious dish! The next time I summon up this mouth-watering meal in the kitchen, it’s photo shoot time! In the meantime, head over to the link provided for the original recipe and stunning photos of this hearty meal that is sure to grace your table (or at the very least your thoughts) again and again.

Burrito? Taco? Quesadilla? Pick your pleasure!

Moroccan-Spiced Lentils: A Flavorful Plant-Based Delight (Recipe)

Recipe Highlight: I recently stumbled upon this amazing recipe from Minimalist Baker for Saucy Moroccan-Spiced Lentils that were simply to die for! The sauce is so flavorful and delicious, and I could not help but think of all the different ways I will use the delectable sauce in the future!


Link: https://minimalistbaker.com/saucy-moroccan-spiced-lentils/


Please click on the link above for the original recipe.

The recipe below includes the changes I made due to personal taste or availability of ingredients based on what I had in my pantry at the time. I doubled the ingredients in the sauce, naturally! MORE SAUCE!

If you use the recipe below, let me know how you feel about these changes!

LENTILS

  • 1 cup raw green lentils cooked per instructions on bag

SAUCE

  • 3 whole cloves of garlic (or to taste)
  • 1 medium onion 
  • 2 large red bell pepper (or use 4 small), seeds removed, roughly chopped
  • 2 Tbsp tomato paste (I use Trader Joe’s from the tube!)
  • 2 Tbsp sorghum syrup (or whatever sweetener you prefer)
  • 1 tsp sea salt (plus more to taste)
  • 2 Tbsp smoked or sweet paprika (plus more to taste)
  • 2 tsp ground cumin (plus more to taste)
  • 1 tsp ground coriander (plus more to taste)
  • 2 tsp ground ginger (plus more to taste)
  • 1 tsp ground turmeric (plus more to taste)
  • 1 tsp cayenne pepper (more or less to preferred spice level)
  • 3 Tbsp lime juice
  • A whole bunch of fresh chopped cilantro (to taste)

INSTRUCTIONS

  • Cook 1 cup of raw lentils per package instructions. I started out with 2 cups of boiling water per 1 cup of raw lentils, adding water throughout the process to keep the lentils cooking until they reached desired texture. I prefer them softer but not mushy.
  • Add sauce ingredients to a blender and combine thoroughly.
  • Taste and adjust for flavor before setting aside.
  • Add sauce to the drained mixture until warmed through and serve over rice. I top with sour cream, a squeeze of lime juice, and a garnish of cilantro.

NOTES

I love plant-based meals! But let’s talk about the sauce …

I would pay to drink the sauce straight from a tap. Inject it in my veins! I am so excited to use this sauce in every way imaginable. If you like to walk on the wild side, play around with the heat levels by adding a touch of ground cayenne or crushed piri piri pepper flakes. You won’t regret it!

Stay tuned for a photo of my spin on this delicious dish! The next time I summon up this mouth-watering meal in the kitchen, it’s photo shoot time! In the meantime, head over to the link provided for the original recipe and stunning photos of this hearty meal that is sure to grace your table (or at the very least your thoughts) again and again.

Do you have a lentil recipe that you love? Let me know in the comments below! I’d love to try it.

New in 2025: Nourishing Recipes & Family Favorites

Happy New Year (and Happy Birthday to me!)

As I move into 2025 and celebrate 50 successful orbits around the sun on this beautiful planet that I call home (what a milestone!), I have decided to double down on my endeavors to improve my health and happiness. Knowing that I sometimes get in a rut and need a reminder of meals that make this journey an enjoyable one, I have decided to document recipes that bring me and my family joy.

New Recipe Tab

While most recipes I share will be done so with the intent to promote improved health and are focused on budget-friendly nourishing meals, I am also choosing to document family favorites for longevity’s sake.

Food and family go hand in hand, and I’d love to know that my children will always be just one click away from reliving a core memory. My children are my everything, and here’s to hoping that one day they will think happy thoughts of all the wonderful memories we’ve made together while enjoying one of these family classics.

50 Years of Love

Noah, Zach, and Audrey … I love you dearly.

To all of my family? Thank you for making these 50 years so special.

Wishing you Improved Health & Nourishing Meals shared with Friends & Family in 2025!

Create a website or blog at WordPress.com

Up ↑