Lacey Almond Thin Cookie Recipe

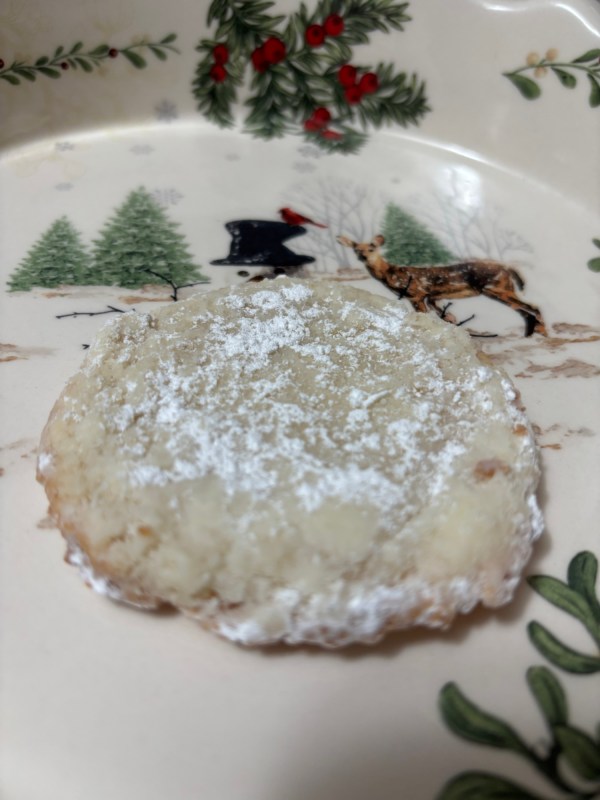
I originally found this recipe listed as Wedding Cookies, but the results were not what I normally associate as such. These cookies more closely resemble a lacey Almond Thin. I feel like the original recipe author perhaps forgot an ingredient when posting (an egg, maybe?), but the results were these rich, thin cookies that became my favorite contribution to the Christmas cookie season.

Let the baking madness that is a hallmark of Christmas begin!

Also: These are AMAZING cold. I’m talking straight-out-of-the-freezer cold! Trust me on this one …

INGREDIENTS

  • 1 cup sugar
  • 1/2 cup butter, softened
  • 3 ounces of cream cheese
  • 1 teaspoon vanilla
  • 1/8 teaspoon almond extract
  • 1 cup flour
  • pinch of salt

INSTRUCTIONS

  • Cream together the first 5 ingredients.
  • Fold the flour and pinch of salt into the creamed mixture.
  • Place dough into fridge to chill for 30 minutes while heating oven to 350 degrees.
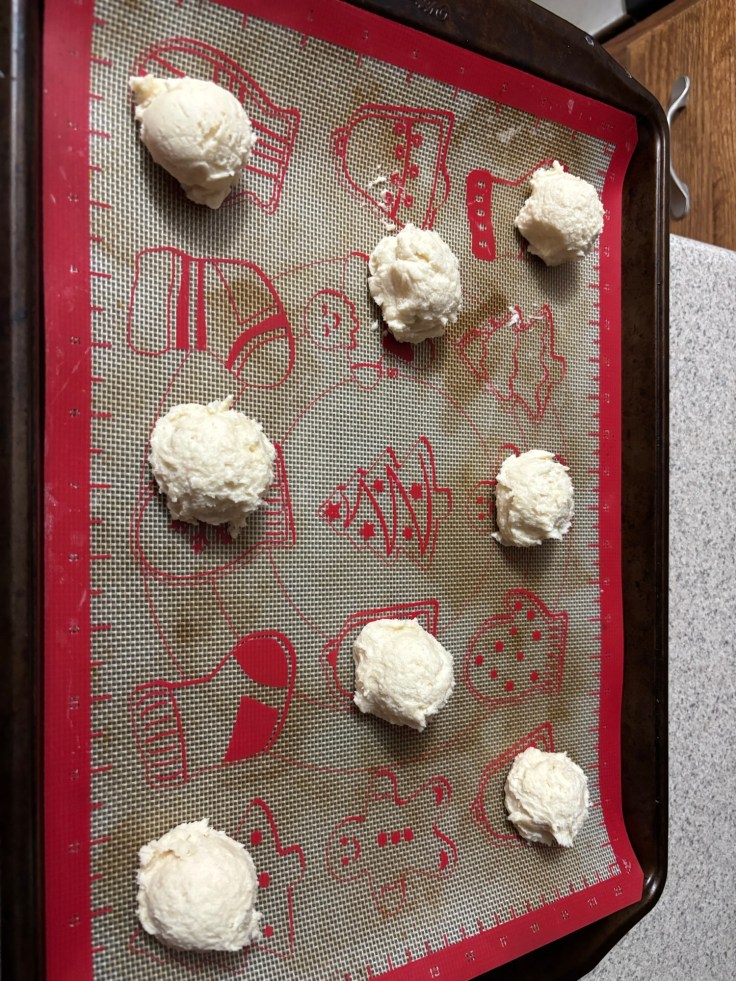
  • Using a small cookie scoop, place 8 dough balls evenly spaced onto ungreased cookie sheet.
  • Place cookies into a 350-degree oven for 14-18 minutes (or until golden brown).
  • Cookies will be spread when cooking and become VERY delicate. They are done when edges are lacey and golden brown. I like the edges very lacey and messy as the crunch is spectacular.
  • Allow to cool almost completely before coating with powdered sugar.
  • Store cooled cookies in fridge (or freezer!) until serving.

This recipe makes about 16 cookies.

Preppy Kitchen’s Delicious Cream Puffs

Recipe highlight: The following is copy/pasted from Preppy Kitchen’s Blog and Youtube tutorials for posterity’s sake. There is invaluable additional information regarding this complicated recipe that can be found by clicking on the provided links. Please check out the original recipe for the best results!

Ingredients

Pastry Cream:

  • 1½ cups whole milk (360mL)
  • 1½ cups heavy cream (360mL)
  • 1 vanilla bean split and seeds scraped
  • ⅔ cup granulated sugar (133g)
  • ¼ cup cornstarch (30g)
  • ¼ teaspoon salt
  • 6 large egg yolks
  • 1 tablespoon cold unsalted butter

Puffs (Choux Pastry):

  • 1 cup water (240mL)
  • ½ cup unsalted butter (113g)
  • 1½ tablespoons granulated sugar
  • ½ teaspoon salt
  • 1 cup all-purpose flour (120g)
  • 3 to 4 large eggs
  • confectioner’s sugar for dusting

Instructions

For the Filling:

  • Combine the milk, ½ cup cream, and scraped vanilla seeds in a medium pot and place on medium-high heat whisking occasionally. Bring to a boil and immediately turn off the heat and set aside.
  • In a large bowl, whisk the sugar, cornstarch, and salt together then add the egg yolks. Whisk until pale yellow and smooth. While whisking, slowly pour in ½ cup of the hot milk mixture until incorporated. Whisk in the remaining hot milk mixture. Pour the mixture through a strainer back into the saucepan.
  • Cook the egg yolk mixture over medium-high heat, whisking constantly, until thickened and just starting to bubble. The whisk should leave a defined trace when moved through the custard. Remove from the heat and whisk in the butter until fully melted and combined. Transfer the custard to a large bowl.
  • Cover with plastic wrap, lightly pressing the plastic against the surface to prevent a skin from forming. Chill for at least 2 hours or until ready to serve. The custard can be made up to 2 days in advance.

For the Choux Pastry:

  • Preheat the oven to 425F. Line a large sheet pan with parchment paper.
  • In a large saucepan, bring the water, butter, sugar, and salt to a boil over medium-high heat. When it boils, immediately take the pan off the heat.
  • Add all of the flour at once and stir hard with a wooden spoon until all of the flour is incorporated. Return to medium heat and cook, stirring for about 60 seconds.
  • Scrape the mixture into the bowl of a stand mixer fitted with a paddle attachment (you can also use a hand mixer). Beat at medium speed for about 2 minutes to cool the mixture down. (it will still be warm.)
  • With the mixer running, add 3 eggs, one at a time, stopping to scrape down the sides of the bowl between each egg. Mix until the dough is smooth and glossy and the eggs are completely incorporated. The dough should be thick but fall slowly and steadily from the beater when lifted out of the bowl. If the dough is still clinging to the beater, add the remaining 1 egg and mix until incorporated.
  • Transfer the dough to a pastry bag fitted with a large round tip and pipe dollops roughly 2 inches in diameter and 1 inch high. Lightly wet a finger and tap down the spike on top. (For additional color during baking, you can brush the tops of the dough lightly with an egg wash.)
  • Bake for about 20 minutes or until the dough is golden brown and appears dry. (Try not to open the oven door during the bake.) Remove the baking sheet from the oven. Carefully poke holes in the side of each puff by inserting the tip of a small knife about halfway into the puff. Return to the oven and bake for another 3 minutes. Remove and let cool completely on the baking sheet. (You can turn the oven off and leave the puffs in the oven with the door cracked open after baking if you’d like them to really dry out.)

For the Assembly:

  • Place the remaining 1 cup cold cream from the filling in a large bowl and beat until stiff peaks form. Remove the custard from the fridge and whisk it to break it up and smooth the texture out. Fold the whipped cream into the custard. Transfer the filling to a piping bag fitted with a star tip
  • Cut the tops of the cooled puffs off with a serrated knife. You can scoop out some of the softer strands inside, if desired. Pipe the cream filling into each pastry then place the cap on, and lightly dust with confectioners’ sugar. Cream puffs are best if enjoyed within a few hours of assembly. Any leftovers can be stored in the fridge in an airtight container for up to 2 days.

Notes

I am STILL trying to perfect this dessert despite it being a family favorite. It is a must-have for my brother’s birthday! And of all the recipes for creme puffs, Preppy Kitchen’s version is definitely my favorite to date!

However, for nostalgia’s sake, I am including a picture of the recipe that my mother used to make creme puffs. The version in the images below was included in a recipe book that was lovingly put together by one of my sisters for all of my siblings after my mother’s passing. While the recipe from Preppy Kitchen is an elevated version, mom’s version is and always will be near and dear to my heart.

Christmas Toffee Bark

INGREDIENTS

  • 1 C butter
  • 1 C brown sugar, packed
  • 2 C chocolate morsels (milk chocolate, semi-sweet, dark … your choice!)
  • 40 saltine crackers (or cracker of your choice … including graham crackers of pretzels!)
  • Topping of your choice, optional (Example: nuts, sprinkles, flaked sea salt)

INSTRUCTIONS

  • Line jelly roll pan with foil. Spray foil with nonstick spray. Lay crackers flat onto foil-covered pan.
  • Cook butter and brown sugar for 6-10 minutes before pouring over crackers.
  • Bake in a 350 oven for 8-10 minutes or until caramel mixture is bubbly.
  • Remove from oven and let sit for 3-5 minutes. Sprinkle chocolate chips on top of and let melt for about 5 minutes. Chocolate morsels will be shiny and soft when ready to spread. Immediately sprinkle the topping of your choice, if desired.

REVIEW

So rich and addictive. You simply cannot tell that crackers are used as the crunchy base for this bark. Totally amazing for an easy holiday treat. A favorite year after year …

For my kiddos: Link to a similar recipe that includes a video in case you have any questions when making this tasty treat: https://www.littlesweetbaker.com/christmas-crack-saltine-cracker-toffee/

MERRY CHRISTMAS!

The Ultimate: Baker by Nature’s “Best Fudge Brownies”

Recipe Highlight: These are rich, fudgy brownies with a perfect crinkled top. The chocolate tastes dark and decadent without being bitter, and the chocolate chips really elevate this sweet treat into something really special.

Please check out the original recipe from Baker by Nature for tons of additional information regarding this recipe! I can’t recommend this enough, as it goes into depth about WHY the ingredients work so well in this recipe. Baking is both an art and a science, and this recipe is beautifully and meticulously crafted.

INGREDIENTS

  • 1 cup (120g) all-purpose flour
  • 1/2 teaspoon baking powder
  • 1/2 teaspoon salt
  • 1/2 cup (43g) unsweetened cocoa powder
  • 1 teaspoon espresso powder optional (don’t use if you don’t like coffee)
  • 3/4 cup (170g) unsalted butter
  • 2 Tablespoons (28ml) oil canola, vegetable, or coconut will work
  • 1 and 1/3 cups (265g) granulated sugar divided
  • 2 large large eggs
  • 1 large egg yolk
  • 2 teaspoons vanilla extract optional, but recommended
  • 3/4 cup (128 grams) chocolate chips

INSTRUCTIONS

  1. Preheat oven to 350 degrees (F) (175 degreed C). Line an 9×9-inch baking pan with parchment paper. Spray lightly with non-stick baking spray and set aside.
  2. In a large bowl, sift together the flour, baking powder, salt, cocoa powder, and espresso powder. Set aside until needed. 
  3. In a medium saucepan, combine the butter, oil, and 1/3 cup of the sugar. Heat over medium heat, stirring frequently, until butter is completely melted. Remove from heat. 
  4. In a large mixing bowl, combine the eggs, egg yolk, vanilla (if using) and remaining sugar. Whisk until well combined, about 30 seconds. 
  5. Slowly, pour the warm butter mixture into the egg mixture, adding it very gradually (a little bit at a time) and whisking constantly until completely combined. 
  6. Add in the dry ingredients and chocolate chips and, using a rubber spatula, slowly stir until just combined. *Do not over mix! Stop stirring when you see the last trace of dry ingredients. Over mixing will give you cakey brownies. 
  7. Scrape the batter into the prepared pan and smooth the top. 
  8. Bake for 28 (to 30 minutes) or until the edges are firm and the top is shiny and slightly cracked. 
  9. Place pan on a cooling rack and cool completely before slicing. 
  10. If desired, top with walnuts.

NOTES

Please note that the recipe as written calls for a 9 x 9-inch pan.

I doubled the recipe to accommodate a 9 x 13-inch pan & opted to top my brownies with walnuts before baking. I can’t stress enough how much we loved these bakery-quality gems. It will forever be my go-to when it comes to satisfying my craving for chocolate.

Kiddos: When you make these, know that I used a mixture of different chocolate chips that I had on hand: some milk chocolate, some dark chocolate, a few semi-sweet. It was a great way to get rid of stray chocolate chips that remained behind after one of Audrey’s notorious cookies baking sprees. I can’t express how proud I am that I have passed down my love of cooking to all of you.

Enjoy!

Audrey’s Favorite Glazed Orange Scones Recipe

Recipe Highlight: https://www.mybakingaddiction.com/glazed-orange-scones/

Makes 8 scones.

INGREDIENTS

Citrus-infused sugar:

  • 1/3 cup sugar
  • zest of two medium oranges

Scones:

  • Citrus-infused sugar (see above)
  • 2 cups all-purpose flour
  • 1 teaspoon baking powder
  • 1/4 teaspoon baking soda
  • 1/2 teaspoon salt
  • 8 tablespoons unsalted butter, frozen
  • 1/2 cup sour cream
  • 1 egg

Glaze:

  • 3 tablespoons unsalted butter melted
  • 1 cup confectioners’ sugar sifted
  • ½ teaspoon pure vanilla extract
  • 2 tablespoons freshly squeezed orange juice

INSTRUCTIONS

  1. Adjust oven rack to lower-middle position and preheat oven to 400°F. Line a baking sheet with parchment paper.
  2. In a medium bowl, make your citrus-infused sugar mixture by combining sugar and orange zest and mixing with your fingertips. Really get in there and mix the zest and sugar between fingertips until the oils are released from the zest! You will know you are there when the sugar is moistened and fragrant. Let the mixture sit on counter for at least 30 minutes to fully infuse flavors if you want to maximize the flavor, but waiting is not a required step.
  3. To the citrus-infused sugar, add in the flour, baking powder, baking soda and salt and mix until combined.
  4. Grate butter into flour mixture on the large holes of a box grater; use your fingers to work in the butter until the mixture resembles coarse meal.
  5. In a small bowl, whisk the sour cream and egg until smooth.
  6. Using a fork, stir sour cream mixture into flour mixture until large dough clumps form. Use your hands to press the dough against the bowl into a ball. The dough will be sticky first, but as you press, the dough will come together.
  7. Place on a lightly floured surface and pat into a 7-inch circle about 3/4-inch thick. Use a sharp knife to cut into 8 triangles; place on prepared baking sheet, about 1 inch apart. Bake until golden, about 15 to 17 minutes. Cool for 10 minutes and prepare the glaze.
  8. In a medium bowl, prepare the glaze by mixing together the melted butter, confectioners’ sugar, vanilla and orange juice. Whisk until smooth. Dip the top of the scones into the glaze and allow the glaze to harden. Double-dipping is best!

NOTES

Kiddos: I love you so much! Please visit the link provided to the original recipe for pictures of the process used in making these amazing scones. As stated in the original recipe, these scones are peak when double-dipped in the glaze. We’ve added cranberries to this recipe, as well as subbed lemon for the citrus and using diced fresh strawberries. I’ve always wanted to do the same with blueberries. The sky is the limit! The base recipe is FANTASTIC, and these scrumptious scones are a great addition to any day! Enjoy!

Delicious Strawberry & Cream Cheese Cobbler

Recipe Highlight: This is one of my kids’ favorites! While some request chocolate for Valentine’s Day, my kiddos request this comforting cobbler.


Link: https://preppykitchen.com/strawberry-cobbler/


Please click on the link above for the original recipe.

If you use the recipe below, let me know how you feel about these changes!

INGREDIENTS:

For strawberries:

  • 2 pounds fresh strawberries hulled and halved
  • 1/2 cup granulated sugar

For cobbler:

  • 9 tablespoons unsalted butter 
  • 2/3 cup sugar
  • 2¼ cup all-purpose flour 
  • 2½ teaspoons baking powder
  • 1¼ cup milk 
  • 2 teaspoons vanilla extract
  • ½ teaspoon kosher salt

For cream cheese filling:

  • 1 block of cream cheese
  • 1/2 cup of powdered sugar
  • 2 teaspoons of vanilla extract

INSTRUCTIONS:

  • Preheat the oven to 350°F.
  • In a large bowl, stir together the strawberries and 1/2 cup of sugar. Set aside to macerate.
  • Add the butter to a 13×9-inch baking dish and place in the preheated oven until the butter is melted, about 10 minutes.
  • Meanwhile, in a medium mixing bowl, whisk together the flour, baking powder, salt, and 2/3 cup of sugar. Add the milk and vanilla extract. Stir just until combined. Set aside.
  • Using a mixer, cream together the block of cream cheese, 1/2 cup of powdered sugar, and 2 teaspoons of vanilla. Set aside.
  • Carefully remove the baking dish from the oven and pour the batter over the melted butter. Next add the cream cheese mixture by heaping tablespoons to the top of your batter. Finally, spoon the juicy strawberries over the batter dotted with cream cheese.
  • Bake for 55 to 60 minutes or until the batter is golden brown and the strawberry juices are bubbling. In the last 15 minutes or so, sprinkle with turbinado sugar for texture, if desired.
  • Let cool for 15 minutes.

NOTES:

The cream cheese filling is an over-the-top addition that my kids loved, but it is entirely optional! It is delicious, regardless! I will continue to update recipe as I tweak here and there.

Kiddos: I love you so much, and I hope you think of me when you make this in your own kitchen.

Mom’s Homemade Corn Flake Candy: A Pantry-Friendly Treat

Mom always had ingredients for this snack on hand, especially during leaner times! It’s a cheap fix for any sweet tooth not watching their waistlines! I post this here, not simply for posterity’s sake, but because not doing so would be criminal! It’s a family favorite.

INGREDIENTS

  • 1 cup sugar
  • 1 cup light Karo syrup
  • 1 cup peanut butter (chunky or creamy … your choice!)
  • 5 cups of corn flakes

INSTRUCTIONS

Bring sugar and Karo syrup to a boil in a large sauce pot. Once boiling, add peanut butter. Bring back to a boil and then cook for 1 minute. Remove from heat and add corn flakes, stirring until coated. Quickly spread mixture onto a counter lined with parchment paper. Cool. Break into pieces before storing.

NOTES

The time on the stove before adding the peanut butter is going to be what determines the texture of the candy. A crispier texture is achieved by adding extra time to the boil before adding in peanut butter. My family always prefers it on the chewier side, so the peanut butter is added ASAP upon boiling and timed to one minute on heat exactly once the peanut butter is added.

Enjoy, kiddos!

Mom’s Crispy Oatmeal Cookies: A Timeless Treat

Memories …

Lunchbox treats. Afternoon snacks. Offerings to Santa.

These cookies are a warm embrace.

My mother would make these for many occasions, and every time I nibble one of these delicious, crispy oatmeal cookies, I am immediately transported to my childhood. When making this recipe, I can see my mom’s delicate handwriting in her little yellow recipe notebook, the well-worn pages marked by messy fingertips.

This recipe is a treasure.

These cookies are my youngest son’s favorite, and I hope that all of my children will have the same sensory memories that I share of my dearly departed mother whenever I smell these baking in the oven.

Noah, Zach, and Audrey? I love you so much.

350 degree oven / Ungreased Cookie Sheet

INGREDIENTS

  • 1 cup shortening
  • 1 cup sugar
  • 1 cup brown sugar
  • 2 eggs
  • 1 teaspoon vanilla
  • 1-1/2 cups self-rising flour
  • 3 cups quick cooking oats
  • 1/2 cup finely chopped pecans, if desired (and we never did)

INSTRUCTIONS

Cream shortening, sugars, egg and vanilla. Mix the dry ingredients together in a bowl and then slowly introduce to the creamed mixture until well combined. Add in the oatmeal (and nuts, if desired).

Divide the dough in half, placing half of the dough onto a sheet of parchment paper or foil, rolling each dough into a log and wrapping tightly. Cookies can be baked immediately or frozen.

When ready to bake, slice cookie dough into thin slices, placing each slice on a parchment lined baking sheet. Cook at 350 for 8 – 10 minutes. Cookies will be done when the edges become slightly golden brown. Remove from cookie sheet immediately and let cool on a wire rack.

NOTES

These are old-fashioned cookies that will bake flat and crispy (akin to the Tate’s brand) instead of thick and cakey (Crumbl, for example).

We prefer our cookies slightly underbaked, golden crispy edges with a soft, chewy center. This is around the 8-minute mark with most ovens. Once removed from the oven, I finish the warm cookies with a sprinkle of Maldon flake salt for the satisfying, salty crunch!

… and don’t forget a tall glass of milk.

Have a favorite oatmeal cookie recipe? Please share!

Old-Fashioned Chocolate Chipper Cookie Recipe

Memories …

Lunchbox treats. Afternoon snacks. Offerings to Santa.

These cookies are a warm embrace.

My mother would make these for many occasions and every time I nibble one of these delicious, crispy chocolate chip cookies I am immediately transported to my childhood. When researching this recipe, it looks like it was originally published in the Joy of Cooking Cookbook, of which my mom was certainly a fan.

These have since found a place in my own home, and I hope that my children will have the same sensory memories that I share of my dearly departed mother whenever I smell these baking in the oven.

Noah, Zach, and Audrey? I love you so much.

375 degree oven / Greased Cookie Sheet

INGREDIENTS

  • 1/2 cup shortening
  • 1/2 cup sugar
  • 1/4 cup brown sugar
  • 1 egg
  • 1 teaspoon vanilla
  • 1 cup flour, sifted
  • 6 ounces package of semi-sweet chocolate chips
  • 1/2 cup chopped nuts, if desired

INSTRUCTIONS

Cream shortening, sugars, egg and vanilla. Slowly add flour and then fold in chocolate chips and nuts. Drop dough by the heaping tablespoon on to a parchment lined baking sheet. Cook at 375 for 10 – 12 minutes. Cookies will be done when the edges become slightly golden brown. Remove from cookie sheet immediately and let cool on a wire rack.

NOTES

These are old-fashioned cookies that will bake flat and crispy (akin to the Tate’s brand) instead of thick and cakey (Crumbl, for example).

We prefer our cookies slightly underbaked, golden crispy edges with a soft, chewy center. This is around the 8-10 minute mark with most ovens. Once removed from the oven, I finish the warm cookies with a sprinkle of Maldon flake salt for the satisfying, salty crunch!

Feel free to experiment … and don’t forget a tall glass of milk.

Have a favorite chocolate chip cookie recipe? Please share!

Create a website or blog at WordPress.com

Up ↑